 If you are visiting this page you have probably purchased one of our organic* dehydrated sourdough starters and are wondering what to do with it. While creating your very own sourdough starter from scratch isn’t difficult, many people find it challenging. Our sourdough starter is an easy way to kickstart your sourdough journey since it already has stable cultures of lactic acid bacteria and wild yeast in it.
*Our starter is made with organic flour & unchlorinated water.
Reactivating Your Sourdough Starter
Your starter arrives in a dormant state. We have carefully dried it so that it is ready to activate when you are ready to begin your journey into sourdough baking. The process of waking up your starter will require a few minutes of attention each day, for about 5 days. There is enough dehydrated starter in each of our packets to make two batches of activated starter. Store your unused dehydrated starter in a cool, dry, and dark place like a cabinet away from the stove, and it will keep for years!
When you are ready to start your sourdough journey gather your supplies and get started!
Supplies:
- *unbleached all purpose flour (use organic flour if you wish to maintain your starter as ‘organic’)
- *unchlorinated water
- a wide mouth, pint size mason jar or small container for the first 3 days
- a larger 1-2 liter container for your active sourdough to live in
- a spatula, spoon, or fork for mixing (I prefer to use a fork)
*Bleach and chlorine can kill the beneficial bacteria in your sourdough starter. If you have chlorinated tap water you may want to try filtered water from your fridge or bottled water (not distilled water.) Every time you feed your starter you will use unbleached flour and unchlorinated water.
01
Day 1
• Take 1 Tablespoon of dehydrated starter and place it in a wide mouth pint size mason jar, add 3 Tablespoons of lukewarm/room temperature water to the jar and mix. Let it sit for a 2-3 minutes and stir again, most of the dried sourdough should be dissolved. A few little lumps may remain.
• Add 2 Tablespoons of unbleached flour and mix, scraping down the sides of your container.
• Cover your container with a lid or saran wrap and set aside somewhere warm for 24 hours. The warmer the room is the quicker the starter will begin to multiply. Ideal temperature is around 75F, if its a little cooler it will take a little bit longer for your starter to multiply. You can try putting the container in your oven with the oven light on.
02
Day 2
After about 24 hours, you should begin to see a few tiny bubbles forming in your starter. It is ok if you don’t see much change at this point.
• Add 2 Tablespoons of unbleached flour to your sourdough starter.
• Add 1 Tablespoon* of lukewarm/room temperature water to your starter.
• Mix thoroughly, scraping down the sides of your container.
• Cover your container once more and let it sit for 24 hours.
* You may need to add a little bit more water to maintain a thick batter consistency.
03
Day 3
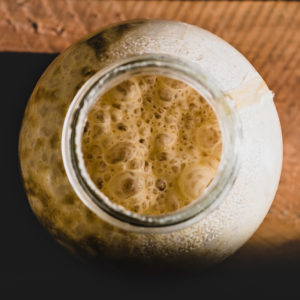
Here we are, 48 hours after we started to wake up our sourdough starter. You should easily see lots of little bubbles in your starter today.
• Repeat the steps from Day 2 by adding 2 Tablespoons flour, 1 Tablespoon* water, then mixing and scraping down the sides, and letting it rest for 24 hours.
* You may need to add a little bit more water to maintain a thick batter consistency.
04
Day 4
Now that we have woken up your sourdough starter it is hungry! Today we will feed it a little bit more than previous days.
• Add 1/2 cup of unbleached flour to your sourdough starter.
• Add 1/4 cup* of lukewarm/room temperature water to your starter.
• Mix thoroughly, scraping down the sides of your container.
• Once you are done mixing, mark the level of your starter either by placing a rubber band around your jar or simply making a mark with a sharpie (it will wash off glass.)
• Cover your container once more and let it sit on your counter. If you are using a lid make sure you just set it on top and don’t close it tightly. If you are using saran wrap just set it lightly on top of your container.
This time your starter should rise quicker than 24 hours. You will want to watch for it to rise almost doubling in size and then start to fall. Once it starts to fall it will be time to feed again. Move on to the next step which is “Day 5.”
It is OK if you if you can’t feed your starter until it falls back to the mark you made on your container.
* You may need to add a little bit more water to maintain a thick batter consistency.
05
Day 5
Today is moving day! Your baby sourdough starter is all grown up and ready to move into it’s permanent home.
My preferred container for housing my sourdough is a 7 cup round Pyrex or Anchor Hocking food storage container with lid. The round shape means no flour gets stuck in corners. The wide opening makes it easy and convenient to feed and mix the sourdough starter. The flexible lid is perfect for keeping out dust or pet hair and handy for storing the starter in the fridge when a break is needed.
• Move your baby sourdough into your larger container (or into a bowl for easy mixing)
• Add 1 cup of flour
• Add 3/4 cup* of lukewarm/room temperature water
• Mix well.
• Your starter will be thick (like a thick pancake batter) and should not be overly runny. You can adjust your consistency by either adding more flour or more water as needed. * You may need to add a little bit more water to maintain a thick batter consistency.
• If you used a bowl for mixing your starter, transfer the starter into it’s larger container now. Mark the side of your container like we did on Day 4 so that you can watch it rise.
Once your sourdough starter has doubled in size it has reached it’s ‘peak activity’ and is ready to use for baking. It will maintain peak activity for a short while and then it will begin to fall. You can choose to make a simple ‘discard’ recipe at this point or you can choose to feed your starter one more time before baking with it.
06
Day 6 and Beyond
From now on your sourdough starter will enter maintenance mode. This is simply a cycle of feeding and discarding/using your starter. Some people literally discard some of their starter by throwing it out if they don’t have time to bake that day, and others will find a simple recipe to make or use it for baking. Over time your starter will get stronger and stronger after repeated cycles of feeding and discarding.
Where you store your sourdough starter will make a difference in how often you will have to feed it. If you keep it on the counter you will have to feed it on a daily basis. If kept in the refrigerator you will have to feed it at least once a week.
Counter instructions:
Once your starter has dropped, or fallen down to the mark you made on your container it is time to feed it. You will remove one cup of starter, and then you will feed it as you did on “Day 5” by adding 1 cup of flour and 3/4 cup of water and stirring it all in. You will let it sit on the counter until it reaches it’s ‘peak activity’ at which point you can bake with it. You will need to feed it daily to keep it happy.
Once the excitement of sourdough baking has worn off and you decide to take a break from daily baking you can take a break by storing your starter in the fridge. Simply feed your starter one more time put the lid on your container and place it in the fridge. The cold temperature will slow down the growing process and you will not have to feed it for a week. When you are ready to feed it or us it again, follow the steps under “Fridge Instructions.”
Fridge Instructions:
Remove your starter from the fridge and allow it to come to room temperature. Open your container and mix everything well. Now you are ready to feed your starter. You will remove one cup of starter, and then you will feed it as you did on “Day 5” by adding 1 cup of flour and 3/4 cup of water and stirring it all in. You will let it sit on the counter until it reaches it’s ‘peak activity’ at which point you can bake with it.
You can either keep it on the counter if you plan on baking with it again the next day or you can return it to the fridge for another week.
Sourdough starter is quite resilient and a little neglect here and there wont kill it. If you find that you have forgotten to feed your starter, or if you notice that after a feeding it doesn’t look as bubbly and active as it once did, don’t fret. Simply give it a few cycles of feeding and discarding in a row watching it for bubble production and watching for it to double. I have successfully resurrected my sourdough starter after a month in the fridge! It did take about 4 days of daily feeding to get it back up to it’s bubbly old self though.
 This may seem tedious and overwhelming at first, but once you get the hang of it your will realize that keeping your sourdough fed and happy only takes a few minutes. The biggest thing to remember is that you need to feed your starter anytime you take some of it out and replacing with more flour and water. If you have any questions feel free to reach out to us.
Happy baking!